
The Loch Ness Monster. Bigfoot. Chupacabra. Godzilla. AD LDS.
Until recently, I thought the Loch Ness Monster had the best chance of any on this list to have been seen by the human eye. Bigfoot is probably just some guy walking around the woods in a ghillie suit (Bing it.) Chupacabra is likely just a dog…albeit a very ugly one. Godzilla is a movie. LDS on the other hand was a myth. Sure Microsoft put the code into Windows Server, but had anyone actually seen it???
All kidding aside, AD LDS isn’t something that even Directory Services SME’s see much of. My only experience to date was in prepping for the Microsoft Certified Master program but that was the extent of it. This is all until last week when I took a case helping synchronize AD LDS with Active Directory. What I came to find is while there is a Technical Reference ( http://technet.microsoft.com/en-us/library/cc732019.aspx ) there is less out there in the way of walkthroughs. While I do not profess to be an LDS expert to any degree, I figured I’d share what I learned with the rest of the world.
Step 1 – Install the LDS role like you would any other role
Installing the role should be self-explanatory. LDS & Adamsync are persnickety at the syntax level so getting this entire process to work requires attention to detail. If something as basic as installing a server role is unfamiliar, consider turning back now while you still can. LDS isn’t nearly as user-friendly as Active Directory.
Step 2 – Configure the LDS instance
In Server Manager choose the Active Directory Lightweight Directory Services Setup Wizard.

Click Next.

We are building a new instance, so choose Next.

Give the instance a Name. This really isn’t that critical and won’t be used in the commands going forward.

Keep the default ports unless this is being installed on a domain controller or you have a compelling reason not to use the default ldap ports. When installing on a DC, the wizard will default to different ports.

Create an application partition unless the software vendor is absolutely certain one is created as part of the install. My advice is to create one when in doubt. It can always be deleted later.

Keep the default install paths.

Keep the default service account

Set the Administrators to fit your environment. For this exercise I’m going to keep the default. Probably best in an enterprise environment to configure an admin group.

On the next screen, import MS-AdamSyncMetadata.ldf, MS-InetOrgPerson.ldf, MS-User.ldf, & Ms-Userproxyfull.ldf

Click Next
Click Next
Finish
Step 3 – Manual schema update
This is where we expand the schema for the LDS instance. This can be done either using the adschemaanalyzer.exe tool or 1 of 2 built-in files. One file is for Server 2003, the other file used below is for 2008 & 2012.
First, as general housekeeping let’s create a c:\lds directory for logs and other needed files.
Go to an elevated command prompt
Change directories to c:\windows\adam
Run the following command ldifde –I –f ms-adamschemaw2k8.ldf –s localhost:389 –k –j . –c “cn=configuration,dc=x” #configurationNamingContext
Note: DC=X is not a placeholder or way of saying “fill in the DN for your LDS instance.” Enter the command to be exactly as dictated.

Step 4 – Edit the Adamsync configuration file.
Next we edit the configuration file that essentially tells Adamsync what to do. This file sets the target AD, the domain admin account we want to bind with, the ldap target in AD for the objects, the LDS instance we want to pull those AD objects into, and an ldap filter for what objects we want to pull.
From Run, Open Notepad c:\windows\adam\MS-AdamSyncConf.xml

This configuration file tells Adamsync what to do.
Make the following edits:
Source-ad-name: DNS name of the AD domain you are syncing from. For purposes of decoding the screenshot down below, bear in mind my lab AD is “my2008.local”
Source-ad-partition: Enter the DN of the Active Directory domain you are trying to sync from.
Source-ad-account: Enter a Domain Admin account. The account in the example file below is called “dirk”.
Account-domain: DNS name of the domain you are syncing from. This is where the Domain Admin account resides.
Target-dn: This is the DN for the LDS application partition we created earlier. In this exercise it’s dc=redcap,dc=local.
Base-dn: The search DN for the domain we’re syncing from. Put differently, the objects we intend to sync will come from this container & below in the Active Directory OU structure. As you’ll see when we discuss the (ldap) object filter, I had trouble getting it to filter just user objects….which, let’s face it, is pretty much the reason most anyone wants to run LDS in the first place. In order to work around this I created an OU for the user accounts LDS needed to sync. It stands to reason that this Base-dn field would be configured to that specific container in AD. In my case that container is cn=users,dc=my2008,dc=local.
Object-filter: The default is * which as most scripters know equates to “everything.” If your organization can manage to construct an OU with only the user objects, and don’t mix any computer objects into it, then we don’t have to worry as much about the filter. That said, the best filter for this is “(&(objectCategory=Person)(objectClass=User))”, however when I add that into the configuration file I get the following error

I have seen a forum post or two that indicate people have gotten this to work, but I did not. As such we can either leave it as * or change to objectClass=User or objectClass=Person.
In the end, here’s a screenshot of my config file.

Save the file somewhere other than c:\windows\adam and feel free to change the name. In this exercise, I saved it to c:\lds\ms-adamsyncConf.xml. Make sure you save it as .xml and don’t accidentally save yours as .xml.txt, which is easy to do.
Step 5 – Adamsync
Run the following to upload the new settings into adamsync. Make absolutely sure prior to hitting enter that the command is pointing to the correct xml file. The default xml is still in c:\windows\adam and if those settings are uploaded none of our customizations will take. Naming the file something else (which I didn’t do) can help eliminate the confusion.
![]()
Each and every time you make a change to the xml configuration file, it needs to be uploaded again using the previous command. The /sync switch doesn’t read the configuration file on the fly, as made clear by the fact that we can change and rename it. Adamsync reads whatever was uploaded with the last /install command and keeps that configuration until it told to do otherwise.
Now the moment we’ve all been waiting for – actually syncing with Active Directory. The distinguished name in the command is that of the LDS application partition. The log file will prove important to getting the LDS schema right, so make sure to define one.

Open the log file to check for errors.

Run a find on the word “error” to check for errors. We’ll address these in a bit. First a note about how to view the LDS instance in ADSI Edit.
To view the instance in ADSIEdit, which I tend to prefer over ldp.
Open ADSI Edit.
Enter the following connection strings & click OK.

Navigate to the Users container.
Step 6 – Fixing the errors.
Synclog – or whatever you name your log file – will have some errors stating an “Object Class Violation.” There is a field “Adding attributes:” that lists some missing attributes. We need to add those attributes to the class using Schema Manager.
Register the schema management dll

Open mmc

Add the Schema Manager snap-in

Change Active Directory Domain Controller

Enter the following to point to the LDS instance, substituting a different port when applicable.

Click Yes on the warning

Browse to the Person Object Class, right-click, and choose Properties.

Choose the Attributes tab and Click Add
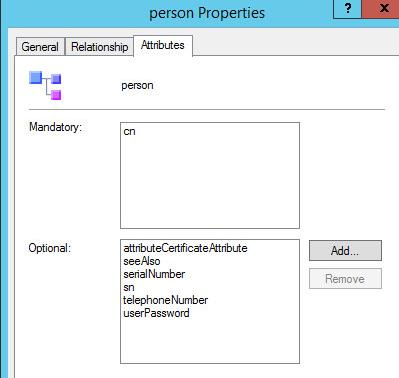
Add the missing attributes from the log file one by one and click OK when complete.

Re-run adamsync, check the log for errors, and refresh ADSI Edit to see if the user objects have been populated.

Repeat this process, fixing the errors until you achieve success.
To remove an LDS instance.
Sometimes we all need a do-over. If your inclination is to start fresh the LDS instance can be deleted by going to Programs & Features and simply uninstalling the instance.

Simply right-click the instance and choose Uninstall as you would a program.
At this point, you don’t need to reinstall the role, you can just run the wizard and configure a new instance.
Conclusion
As I learn more, I will make sure to circle back and edit this post. While Microsoft’s technical reference for LDS is there to lean on, there are some things that weren’t spelled out as explicitly as I would have liked. Hopefully between this post and the official Microsoft documentation, you can wind your way towards getting LDS to work in your environment. As always, feel free to post a question or comment and share what you know!

Awesome guide, I was struggling with this migration for a while, thanks 🙂
btw there are others errors that can come out in adamsync that I’ll think you could cover, for example I experienced a naming violation because adamsync was trying to create an OU under a CN when its forbidden by the schema.
Thanks Juan. On most of the subjects here I’m writing from an authoritative standpoint, but LDS is most definitely an exception: meaning, I certainly don’t feel like an expert with LDS so was really hoping to simply start the conversation and have others respond with their experiences. Thank you for doing just that! If you happen to have taken a screenshot of or written down the specific error message, please post back so that we (and anyone else who reads this going forward) will know what it means when it rears its head. Anyone else with AD LDS or adamsync errors feel free to do the same, even if you haven’t figured out what they mean yet. Perhaps someone will see and be able to help.
I did not take an screenshot, but the error was something like this:
Ldap error occured. ldap_add_sW: Naming Violation.
Extended Info: 00002099: NameErr: DSID-030510C6, problem 2005 (NAMING_VIOLATION), data 0, best match of:
‘CN=yourinstance,DC=yourdomain,DC=com’
Its probably telling you you can’t create an OU under a container according to the schema we just loaded into the instance, so what I did was change the application partition to:
‘OU=yourinstance,DC=yourdomain,DC=com’
This way any OU it tries to sync under the root of your partition will not fail.
Wonderful Guide…Very useful. Thanks a lot
Fantastic article. On the Object filter side, you can use:
(|(objectCategory=Person)(objectClass=User))
The pipe instead of the ampersand.
Hope this helps!
Pete Baughan
Windows Admin
Hey, thanks Pete. Appreciate the tip!
We are using AD LDS for routing decisions on an AudioCodes gateway, because we need to have a little copy of it at remote sites that don’t have their own DCs. I was very, very careful picking the additional class (Contact) and attributes I needed (various msRTCSIP-*) in the Schema Analyzer, as well as picking a good filter and s for the ADAMsync config file, and got a good sync the first time 🙂
Thanks for the clearest guide to AD LDS and ADAMsync I’ve seen so far! Now to figure out the whole replication to other AD LDS instances thing…
Fantastic article, thank you for posting this! I did get a little hung on step 3 but found this post to hold my hand through the process: http://www.experts-exchange.com/OS/Microsoft_Operating_Systems/Server/Q_26735824.html
The only error I received is noted below, but so far I haven’t figured out what it means.
Ldap error occured. ldap_modify_ext_sW: Constraint Violation.
Extended Info: 000020B1: AtrErr: DSID-030F101C, #1:
0: 000020B1: DSID-030F101C, problem 1005 (CONSTRAINT_ATT_TYPE), data 0, Att 904e1 (proxiedObjectName)
Anyone have any recommendations or guides on setting up one of the authentication methods? Thats my next hurdle.
Very detailed guide. I was able to complete up to step 5. Opened the logs and got this error:
Adamsync.exe v1.0 (6)
Establishing connection to target server localhost:1389.
Saving Configuration File on O=Microsoft,C=US
Saved configuration file.
ADAMSync is querying for a writeable replica of dc01.
Error: DCLocator call failed with error 1355. Attempting to bind directly to string.
Establishing connection to source server dc01:389.
Ldap error occured. ldap_bind_s: Invalid Credentials.
Extended Info: 8009030C: LdapErr: DSID-0C0904DC, comment: AcceptSecurityContext error, data 52e, v1db1.
Ldap error occured. ldap_bind_s: Invalid Credentials.
Extended Info: 8009030C: LdapErr: DSID-0C0904DC, comment: AcceptSecurityContext error, data 52e, v1db1.
I tried to follow step 6 about fixing the errors by I can’t seem to change the Active Directory domain controller to be AD LDS config in Schema Manager.
If anyone has any idea on what could be wrong I would really appreciate it if you could let know. Thanks!